Thursday, September 27, 2012

Hobbit Day 2012

Last Friday we celebrated Bilbo's birthday and the official Hobbit Day that was encouraged around the world.
We made plans for this day that involved a lot of food in fact 6 meals for the day.
Eden prepared the invitations for everyone. Handwritten on a rough looking parchment type invitation. I especially like the Elvin script. Complete with a Hobbit name for each of us
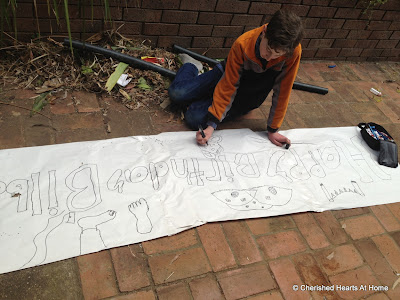
Rogan was very keen to make the banner that we put up on the balcony for the 'party goers' to see
 So to start the day off we had First Breakfast which consisted of mushrooms, with sourdough fried bread, eggs, bacon and tomatoes
 Through out the day we had tea and coffee Drinks -Ginger beer, honey and lemon drinks.
 I LOVE HOBBIT DAY, IT GIVES ME A MAJOR EXCUSE TO PIG OUT AND NOT FEEL GUILTY COZ   I'M A HOBBIT :] thank you for writing this Autumn sweetie.
Second Breakfast - strawberries with cream,
 Elevenses  was scones with jam and cream.
Corbyn loves making these Spelt flour soaked scones
We set the table with our beautiful white table cloth and of course we had to have our special  tea cups
Oh yes these were extremely yummy
Our little Hobbit kept getting in his hobbit hole over and over again
Each year we add hobbit feet by simply drawing on with textas
Our Hobbits are all dressed up and ready to party. We left the elf, who seemed to be unable to keep up for the day asleep inside.
Some of our youngest hobbits, Arwen, Corbyn and Myffwyn, all dressed up and ready to party
Moran and Rogan ready as well
Could this be Merry and Pippin? NO it is Vellvin and Eden!
Musical chairs was one of the  most favoured games we played on this day.
Back to the food.
Luncheon  was fried potatoes, onions and apples. Might I add by this stage we were starting to feel a little full
Our children love to decorate and we had fun preparing our new home  with streamers and balloons (well they got blown up but the little kids played with them before we could  put them up).
We had Luncheon out side on the decorated balcony.
Afternoon Tea  consisted of Apple pie and custard
I did print out some pictures for the children to colour in. It is so sweet to see our littlest on enjoying sitting down at the table and  colouring.
Have I mentioned that this year we made a gigantic cake for us to light up and sing Happy Birthday to Bilbo. One of the funny things about the day was the children themselves decide on characters and Arwen wanted to be Bilbo. So all day she kept going around telling us all that it was HER birthday and it was her birthday cake.
Starting to decorate with whipped cream.
Saxon with the help of the little ones decorated the cake.
The finished cake complete with Frodo on top of what I called "Mount Doom"
We made these glow stick lanterns to decorate the table for dinner
Glow stick lanterns were super easy to make. I cut up the glow stick into the jar and shook it up. I left the the cut sticks in the jars, even though I know other instructions did not say to do this, they added to the glow effect
We had dinner outside on the balcony with the glow lanterns.
Quite frankly we had had enough of preparing and eating food by this stage and of course washing up so we actually combined Dinner and supper together.
We had meat pies, cold cuts, pickles and eggs  as well as the supper of cheese, crackers.
Lighting the candles on the cake is always exciting and I love how the kids set it up so that  it looks like Frodo is lighting the candles
See that huge slice of cake being cut out? Well we did not each much of it due to the fact that we had eaten almost non stop it seemed all day.
This is the remainder of the cake after we had taken that first slice. In fact we did not even eat all of this slice and the rest is in our freezer waiting to be eaten still.

After the clean up we all pretty much went to bed as it had been a very long and exhausting day and we had a big day the next day with our Kynan coming home to celebrate his birthday late too. It had been months since we had seen Kynan and we were all so very excited to be seeing him in the morning.

So until next year we hope you  had a Happy Hobbit Day in your homes too!!

Blessings to you and your homes,
 

Wednesday, September 26, 2012

Ideas for Michaelmas

I have given very little thought to this feast day this year and it suddenly struck me that it marks the start of a couple of weeks of intense feast day celebrations.

So for now looking at Saturday, I think we will be focusing on ~
colouring in pictures,
making a row of angel folds,
making some felted angels,
read the story of St Michael in this book,
 and some simple foods perhaps a cake of some sort.

If you are looking for more ideas than these simple ones I have written up plans in the past HERE

 We have also clebrated by performing two plays in the past : The Battle for Heaven and Who Reigns Supreme?

Have a most blessed feast day of St Michael
Prayer~
Saint Michael the Archangel,
defend us in battle.
Be our protection against the wickedness and snares of the devil.
May God rebuke him, we humbly pray;
and do Thou, O Prince of the Heavenly Host -
by the Divine Power of God -
cast into hell, satan and all the evil spirits,
who roam throughout the world seeking the ruin of souls.
Amen.

Blessings to you and your homes,
Tuesday, September 25, 2012

Refinished Coffee Table – the details!


A little while back I shared a sneak peak of a coffee table project I was about to begin using a new-to-me refinishing technique.  I am happy to report it is complete and turned out even better than I had hoped!


Above is what the table looks like today and below is a picture of what the table looked like when I started.  I loved the shape and scale of the table for our office sitting area but it was very orange and too shiny. 


My original refinishing plan was to use a furniture stripper followed by sanding with a palm sander.  My plans changed, however, when I visited my local Lowes store.  The salesperson I worked with just happened to be a woodworker and suggested I try using acetone for removing the finish, followed by a good hand sanding.  The acetone, he said, would remove all the inorganic elements (stain and varnish) from the wood and by using a 00 grade of steel wool the table would require only hand sanding to achieve a perfectly smooth finish.   It sounded pretty simple so I decided to give it a try.

After he explained the safety considerations when working with acetone – it will burn your skin and eyes and is highly flammable and should only be used in well ventilated (outside) areas away from any open flames – we went around the store gathering up the supplies.  I needed acetone, chemical safe gloves, a full chemical face mask, 00 grade steel wool, fine grit sand paper and a small metal bucket.

I began the project by removing the brass casters and decorations from the table. The table was then placed outside on rocks (acetone will kill grass) in the corner of our garden area on top of a layer of plastic and newspapers.  I tied my hair back, wore long pants, a long sleeved shirt tucked into the chemical safe gloves and the face mask to make sure I was fully protected.


Once I was ready to go, the project was fairly straight forward.  Simply pour about an inch or two of acetone in the metal bucket, dip the steel wool into the acetone and then start scrubbing with the grain of the wood.  (Acetone will evaporate quickly so you only want to pour a small amount in the bucket at a time.)  Keep dipping the steel wool into the acetone and scrubbing.  When the steel wool “wears out” grab a new piece and repeat the procedure until you are satisfied with the results. 

After all the finish was removed, I sprayed the table with water using a garden hose and let it dry outside.  When the table was completely dry it was time for a hand sanding to even out the grain of the wood and remove any residue. 

It took about 3 hours for me to remove everything from the wood using the acetone and steel wool plus more time for sanding. It was a lot of work but the results were worth the effort.  The table was returned to the natural wood color and was extremely smooth.


Since I wanted the table to have a light, slightly white finish, I decided to try another first for me - Briwax liming wax.  I could not find it locally so I ended up ordering the wax online.  I simply followed the directions on the can and applied small amounts using a cotton cloth.  I kept applying the wax until I had the look I wanted.  Once the wax was dry it was time for a top coat of furniture wax.  I used a clear finish furniture paste wax by Minwax. 


The table turned out wonderful!  I also have to say liming wax has now been added to my list of favorite products.  I have already used it on another project which I will be sharing shortly and have found myself looking around my house to see what other wood pieces I can use it on!

I am curious to know, have you ever tried using acetone and/or liming wax?  Were you happy with the results?  Looking forward to hearing about your experiences!

Note:  Please be sure to read all the instructions and warnings on the acetone container and wax as well as consulting with a salesperson to make sure you have all the proper equipment to order complete this project safely.